Random Talk:#
I have written some articles before:
- Hideipnetwork v2 Online Web Proxy
- hideipnetwork-web Node.js + services wokers Online Proxy Program
- Hideipnetwork Node.js + services wokers Online WEB Proxy
- Build Two WEB Proxies Using Workers to Access the Internet Anonymously
Among them, I introduced two online web proxy programs, one is hideipnetwork-web and the other is siteproxy.
Let me briefly talk about the history of these two programs that I have encountered. First, I knew about siteproxy because it can be set up by directly copying the code using Cloudflare Workers. Later, the initial version of hideipnetwork-web could also be set up with Workers. However, it was abandoned as the version was updated. hideipnetwork-web has been continuously updated, and some users have tested that it can log in to YouTube and Google accounts, but I have not verified this.

After siteproxy was released, it was not maintained, but it started to be maintained and updated again in 2024. So I wrote an article to record it. In the beginning, siteproxy could access YouTube normally, but there were some small bugs that did not affect its function. However, later on, some components of YouTube could not be displayed, and it became completely unusable. However, both of these programs work fine for proxying ordinary websites and rarely encounter errors.
Currently, hideipnetwork-web has been updated to v3, and siteproxy can also proxy YouTube normally. Initially, I wanted to proxy the sharing, subscription, and live streaming of Bad Lin, and create a page to share it with more people. However, hideipnetwork-web obfuscates some website parameters and links and performs some checks and verifications, making it impossible to access directly. (The idea was to directly embed the live stream proxy into the webpage)
I casually looked through my previous articles and found that siteproxy has been updated, which is great!!!
Setup Tutorial:#
Basically, the setup tutorials are similar to the ones I wrote before, and there are also documents on GitHub. Let's briefly go through them based on the current version.
hideipnetwork-web#
hideipnetwork-web GitHub: https://github.com/Hideipnetwork/hideipnetwork-web/tree/v3
hideipnetwork-web Official Website: https://official.hideip.network/
There is no Workers version available now, so you can only deploy it on your own server with Node.js environment. The setup process is very simple.
I am using Node.js v16.20.2, and the npm module must be installed. If you want to deploy it using Baota-Website-Node project, I think it is not wise because it failed repeatedly when I tried to set it up myself.
The best way is to use the command line to set it up easily:
# Download and install the script

git clone -b v3 https://github.com/Hideipnetwork/hideipnetwork-web.git

# Enter the folder

cd hideipnetwork-web

# Install and initialize

npm install

# Run the hnet server

npm run start

# Make the server persistent!

npm i pm2 -g && pm2 start index.mjs --name HNet
I directly used Baota to add a task in the process manager, and filled in the command npm run start.
siteproxy#
siteproxy GitHub: https://github.com/netptop/siteproxy
siteproxy Official Website: https://www.netptop.com/
Deploying with Workers is very simple. Just create a Workers on Cloudflare and download the code from GitHub: https://github.com/netptop/siteproxy/blob/master/build/worker.js
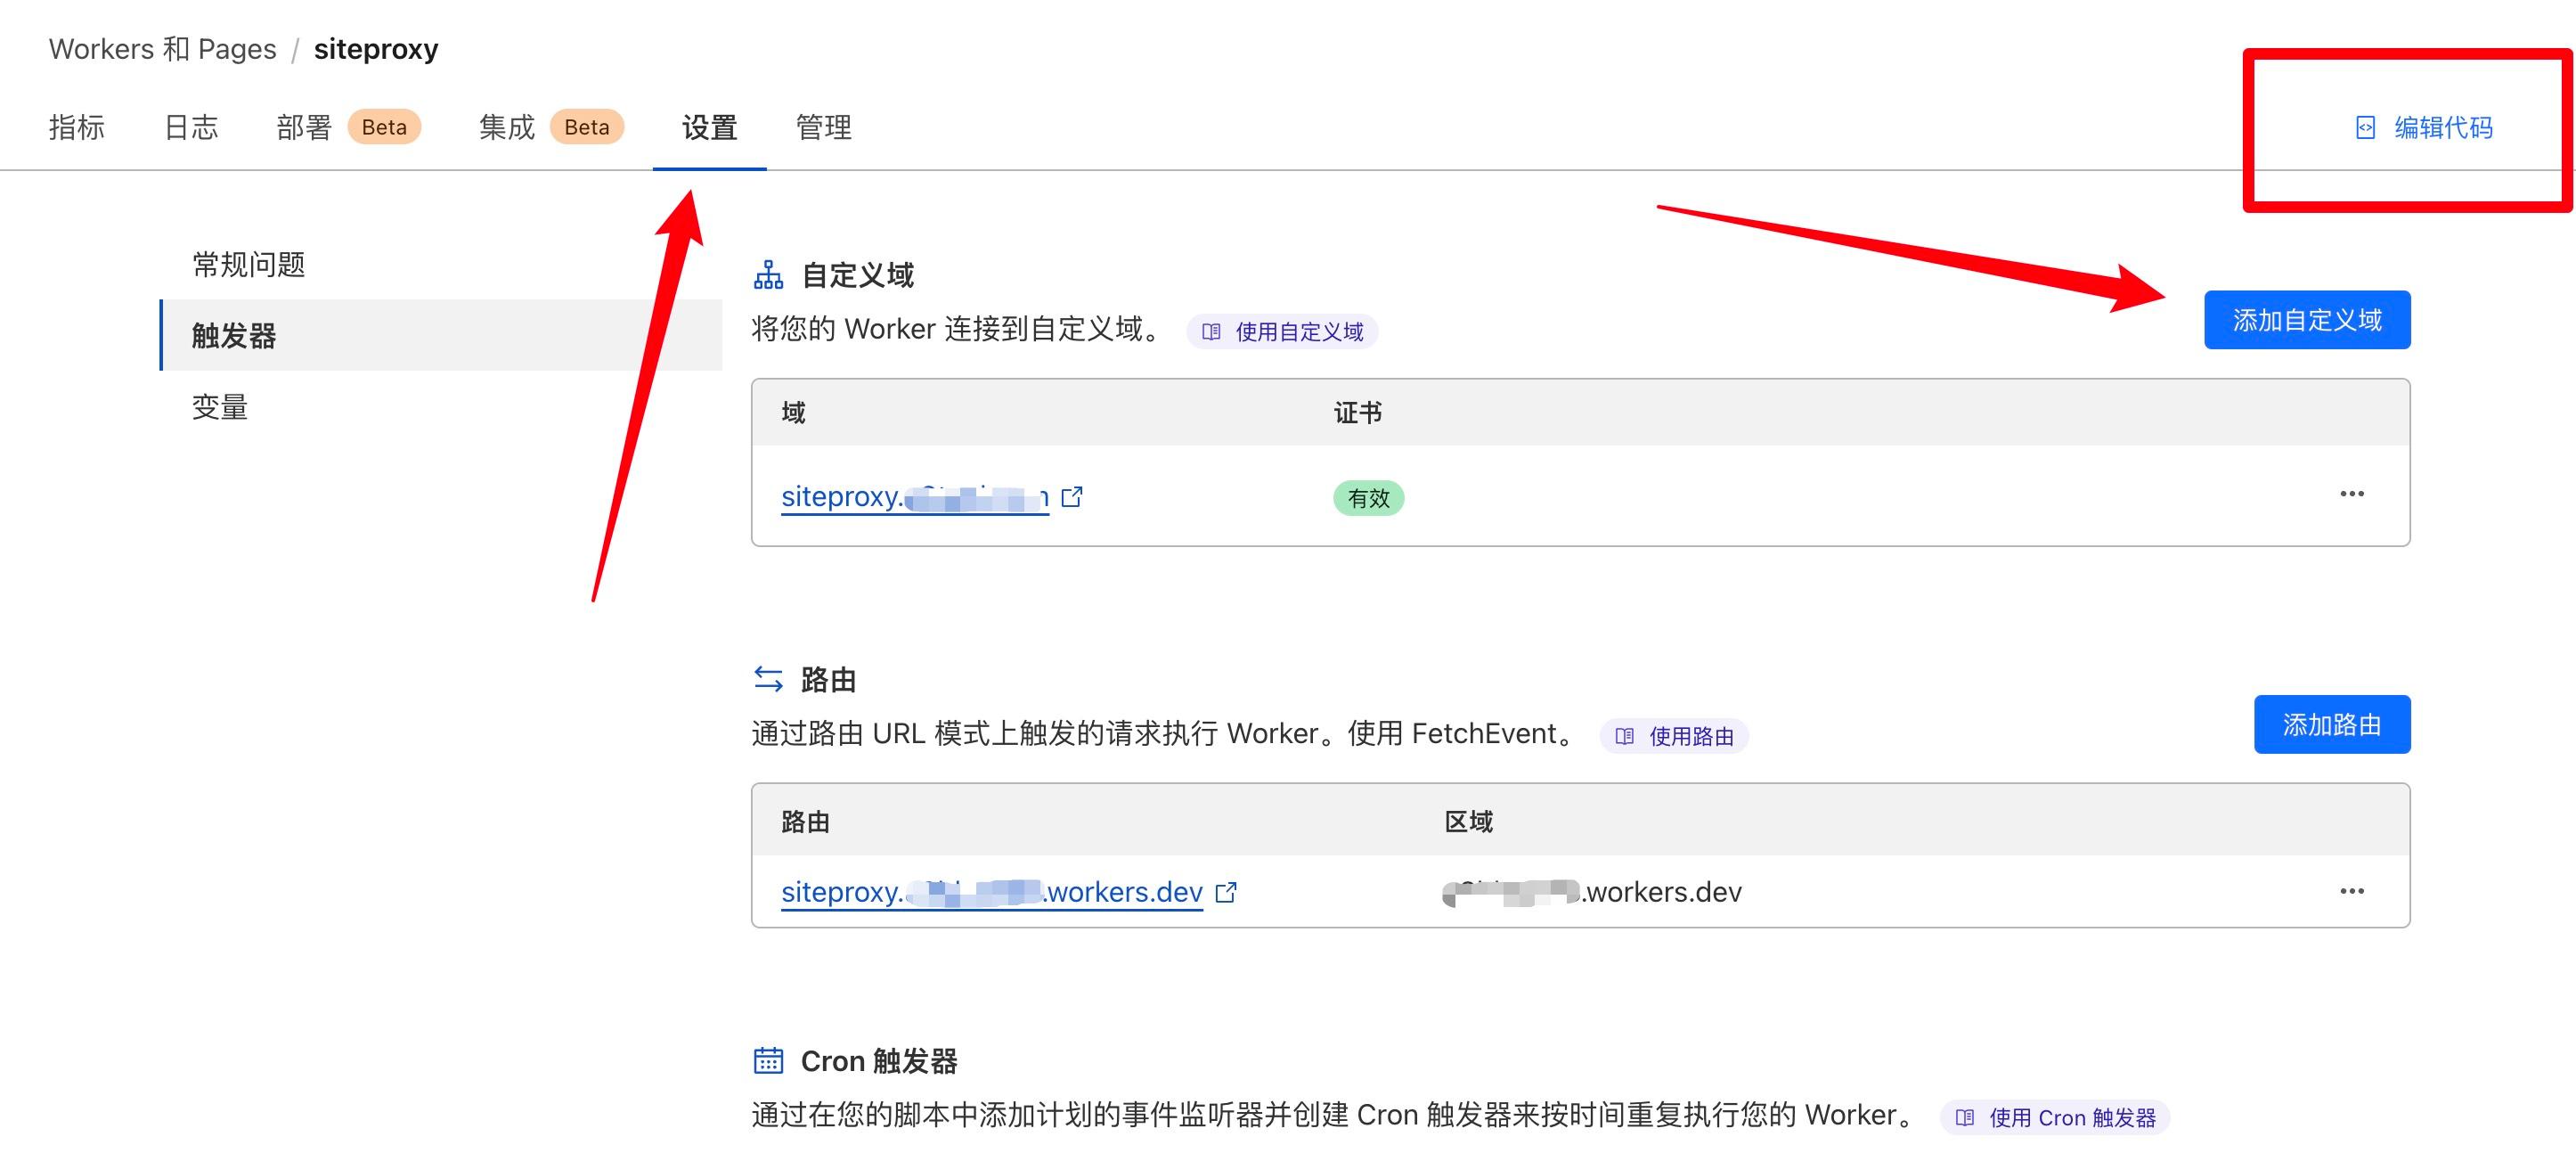
First, search for http://localhost:5006 and modify it to your own domain name or the domain name provided by Workers. If you want to add your own domain name, your domain must be hosted on Cloudflare first, and then go to Workers settings - Triggers - Custom Domain to set your domain.
Pay attention to modifying the domain name with the correct HTTP protocol, for example: https://a8dog.com.
At the same time, search for /user22334455/ and modify it to the password path you want to set. Then you can access the proxy through the domain name + path, for example: https://a8dog.com/archives/. Note that the trailing slash cannot be omitted, both in the file and when accessing the domain name. ⚠️
VPS Server Deployment:
1. Create an SSL website (use certbot and nginx, search for usage on Google), configure nginx,
   /etc/nginx/conf.d/default.conf should include the following content:
   ...
   server {
      server_name your-proxy.domain.name
      location / {
        proxy_pass       http://localhost:5006;
      }
   }
2. Execute: sudo systecmctl restart nginx
3. Execute the following commands to install the Node environment under the user environment. If you already have the Node environment, ignore this step.
   (1) curl -o- https://raw.githubusercontent.com/nvm-sh/nvm/v0.35.3/install.sh | bash
   (2) source ~/.bashrc
   (3) nvm install v18
4. Execute: git clone https://github.com/netptop/siteproxy.git;
5. Execute: cd siteproxy;
6. Test if it can run: node bundle.js. If there are no errors, press ctrl+c to end the program.
7. Open and modify the config.json file:
   {
      "proxy_url": "https://your-proxy.domain.name", // This is the domain name of your proxy server that you applied for, note that it is https
      "token_prefix": "/user-SetYourPasswordHere/",  // This is actually the password for your website to prevent unauthorized access, note to keep the slashes at the beginning and end.
      "local_listen_port": 5006, // Do not modify this so that it is consistent with the previous nginx configuration.
      "description": "Note: token_prefix is equivalent to the website password, please set it carefully. The combination of proxy_url and token_prefix is the access URL."
   }
8. Install forever: npm install -g forever;
9. Execute: forever stopall; forever start bundle.js
10. Now you can access your domain name in the browser. The URL is the proxy_url combined with token_prefix.
11. If you want to use Cloudflare for acceleration, you can refer to the Cloudflare instructions.
Docker Deployment:
1. Configure the SSL certificate corresponding to the domain name and nginx to point to the local port 5006.
2. Clone this project.
3. Open and modify the config.json file:
   {
      "proxy_url": "https://your-proxy.domain.name", // This is the domain name of your proxy server that you applied for
      "token_prefix": "/user-SetYourPasswordHere/",  // This is actually the password for your website to prevent unauthorized access, note to keep the slashes at the beginning and end.
      "description": "Note: token_prefix is equivalent to the website password, please set it carefully. The combination of proxy_url and token_prefix is the access URL."
   }
4. Enter the docker-node subdirectory. sudo docker compose up
5. Now you can directly access https://your-proxy-domain.name/user-your-password/, that's it. Note that you need to replace the domain name and password with your own domain name and password.